Implementing Social login in Drupal 8

Social login is single sign-on for end users. By using their existing login data from a social network like Facebook or Google, they can sign into your website without having to create a new account specifically for your website.
This is good, because it simplifies registrations and logins, and that should increase the number of registrations on your website. It's far easier for end users to just click on a link on your website and be logged in, than to fill in the registration form which contains several input fields.
And because the social network provider is responsible for email verification, you can be sure that you will get a real email address.
Social login works in a very simple way. There are 3 steps:
- The user comes to your website and clicks on the Login with _____ link
- User is redirected to the Social network provider where they have to confirm the login process (only if they haven't done it yet)
- Once the social network provider confirms the user’s identity, the user will be redirected back to your site and logged in
If you want to add Login with Google or Login with Facebook functionality to your site, Drupal has got you covered. There is a large number of Social Auth modules. Take a look at the following page to find out more: https://www.drupal.org/project/social_api
But what if you want to use a service that is not yet supported by the Drupal community? Thanks to the enormous flexibility and extensibility of Drupal 8, you can implement this functionality relatively quickly.
The very first thing that you should do is to read the service's documentation to fully grasp the entire auth process. Once you are ready, you can proceed with coding. Investing the time in preparation will reduce the time of realization.
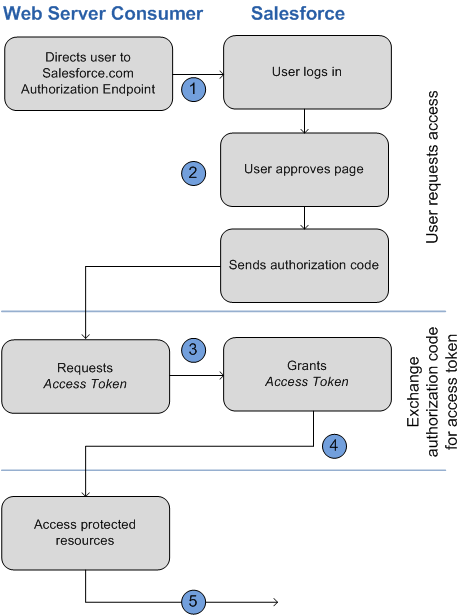
In this blog post I will use Salesforce as an example to show you how easy is to implement Login with Salesforce. You can read more about Salesforce authentication flow here: https://help.salesforce.com/articleView?id=remoteaccess_oauth_web_server_flow.htm
Let's alter the login form and add a new form element. The new element provides a link (step 1) to the Salesforce authorize service.
/**
 * Implements hook_form_alter().
 */
function login_with_salesforce_form_user_login_form_alter(&$form, FormStateInterface $form_state, $form_id) {
  $form['login_with_salesforce'] = [
    '#type' => 'link',
    '#title' => t('Login with Salesforce'),
    '#url' => login_with_salesforce_generate_login_link(),
    '#weight' => 100,
  ];
}
Function login_with_salesforce_generate_login_link() will generate the required link.
/**
 * Generates "Login with Salesforce" link.
 *
 * @return \Drupal\Core\Url
 */
function login_with_salesforce_generate_login_link() {
  $config = \Drupal::configFactory()->get('login_with_salesforce.settings');
  $login_url = $config->get('login_url');

  $url = Url::fromUri($login_url . '/services/oauth2/authorize', [
    'query' => [
      'response_type' => 'code',
      'client_id' => $config->get('client_id'),
      'redirect_uri' => $config->get('redirect_uri'),
    ]
  ]);

  return $url;
}
As you can see we are constructing the link according to the Salesforce documentation. The client_id is the ID that you get once you register your application with Salesforce. You can see how you can register your app here: https://help.salesforce.com/articleView?id=connected_app_create.htm
The next step is to create a callback route. This is where Salesforce will send data after performing an authentication (step 3). This route should be uncached and everyone should have access to it:
login_with_salesforce.callback:
  path: '/salesforce/callback'
  defaults:
    _controller: '\Drupal\login_with_salesforce\Controller\SalesforceController::callback'
    _title: 'Login with Salesforce callback URL'
  requirements:
    _access: 'TRUE'
  options:
    no_cache: 'TRUE'
The corresponding Controller method is doing two things:
/**
   * Callback method.
   */
public function callback() {
  $code = \Drupal::request()->query->get('code');
  if (!$code) {
    return $this->redirect('user.login');
  }
  $token_data = $this->requestToken($code);
  if (!$token_data) {
    return $this->redirect('user.login');
  }
  $this->loginUser($token_data);
  return $this->redirect('<front>');
}
After the user is redirected back from Salesforce to your website, the url should contain the code query param. You should use this param to request token.
/**
   * Gets token from Salesforce.
   *
   * @param $code
   *
   * @return string|null
   */
protected function requestToken($code) {
  $login_url = $this->configFactory->get('login_url');
  try {
    $response = $this->httpClient->post($login_url . '/services/oauth2/token', [
      'form_params' => [
        'grant_type' => 'authorization_code',
        'client_id' => $this->configFactory->get('client_id'),
        'client_secret' => $this->configFactory->get('client_secret'),
        'code' => $code,
        'redirect_uri' => $this->configFactory->get('redirect_uri'),
      ],
    ]);
    return json_decode($response->getBody()->getContents(), TRUE);
  } catch (\Exception $e) {
    $this->loggerFactory->error('Request token error in ' . $e->getFile() . ' at line ' . $e->getLine() . '. Message: ' . $e->getMessage());
    return NULL;
  }
}
If successful, the token data will contain user information like username and email. You can then use that data to create a new user in Drupal:
/**
   * Log in user.
   *
   * @param $token_data
   *
   * @throws \Drupal\Core\Entity\EntityStorageException
   */
protected function loginUser($token_data) {
  $id = $token_data['id'];
  $access_token = $token_data['access_token'];
  $refresh_token = $token_data['refresh_token'];
  $issued_at = $token_data['issued_at'];
  $user_data = $this->getUserData($id, $access_token);
  $user_email = $user_data['email'];
  $user_name = $user_data['username'];
  /** @var \Drupal\user\Entity\User $user */
  $user = user_load_by_mail($user_email);
  if ($user) {
    $this->userData->set('login_with_salesforce', $user->id(), 'id', $id);
    $this->userData->set('login_with_salesforce', $user->id(), 'access_token', $access_token);
    $this->userData->set('login_with_salesforce', $user->id(), 'refresh_token', $refresh_token);
    $this->userData->set('login_with_salesforce', $user->id(), 'issued_at', $issued_at);
    user_login_finalize($user);
  }
  else {
    $user = User::create();
    $user->setPassword(rand());
    $user->enforceIsNew();
    $user->setEmail($user_email);
    $user->setUsername($user_name);
    $user->activate();
    $user->save();
    user_login_finalize($user);
  }
}
This method is registering a new user or login in the existing user, depending if there is a user with provided email address or not.
And that's it. With a few lines of code you have a working module. Add some exception handling, config form and you are good to go.
If you don't want to code all this by yourself I created Login with Salesforce module. You can find it here: https://github.com/gnikolovski/login_with_salesforce